


Device Security Configuration - Lab Exercise
Device Security Configuration - Lab Exercise
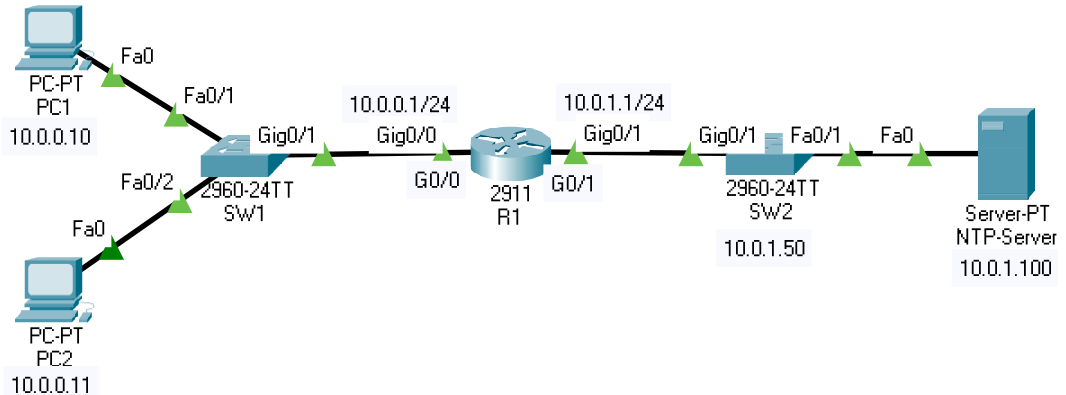
In this lab you will secure administrative access to the Cisco router in a small campus network.
Lab Topology:
Secure Privileged Exec Mode
1) Set the enable password Duytan2 on R1 to secure access to Privileged Exec (Enable) mode.
R1(config)#enable password Duytan2
2) Exit to User Exec mode.
R1#exit
3) Enter Privileged Exec mode.
R1>enable
Password:Duytan2
R1#
4) Set the enable secret Duytan1.
R1(config)#enable secret Duytan1
5) Exit to User Exec mode.
R1#exit
6) Do you expect to be able to enter Privileged Exec mode using the password Duytan2? Why or why not? Verify this.
You cannot enter Privileged Exec mode using the enable password because it has been superseded by the enable secret.
R1>enable
Password:Duytan2
Password:Duytan1
R1#
7) Show the running configuration on R1. Can you read the enable password and secret in plain text?
The enable password is shown in plain text but the enable secret is encrypted.
R1#show run
Building configuration...
Current configuration : 762 bytes
!
version 15.1
no service timestamps log datetime msec
no service timestamps debug datetime msec
no service password-encryption
!
hostname R1
!
enable secret 5 $1$mERr$J2XZHMOgpVVXdLjC9lYtE1
enable password Duytan2
8) Ensure that passwords will not show in plain text in the output of ‘show’ commands.
R1(config)#service password-encryption
9) Verify the enable password is now encrypted when you show the running configuration.
R1#show running-config
Building configuration...
Current configuration : 772 bytes
!
version 15.1
no service timestamps log datetime msec
no service timestamps debug datetime msec
service password-encryption
!
hostname R1
!
enable secret 5 $1$mERr$J2XZHMOgpVVXdLjC9lYtE1
enable password 7 0807404F0A1207180A59
Secure Remote Telnet and SSH Access
10) Enable synchronous logging on R1 and ensure administrators are logged out after 15 minutes of activity on the console and virtual terminal lines 0-15.
R1(config)#line console 0
R1(config-line)#logging synchronous
R1(config-line)#exec-timeout 15
R1(config)#exit
R1(config)#line vty 0 15
R1(config-line)#logging synchronous
R1(config-line)#exec-timeout 15
R1(config)#exit
11) Allow the administrator workstation at 10.0.0.10 to Telnet into R1 using the password Duytan3. Ensure no other host has Telnet access to the router.
R1(config)#access-list 1 permit host 10.0.0.10
R1(config)#line vty 0 15
R1(config-line)#login
R1(config-line)#password Duytan3
R1(config-line)#access-class 1 in
12) Ensure that users attempting to Telnet into the router see the message “Authorised users only”
R1(config)#banner login "
Enter TEXT message. End with the character '"'.
Authorised users only"
13) Verify you can Telnet into R1 from PC1 and enter Privileged Exec mode. Close the Telnet session when done.
C:\> telnet 10.0.0.1
Trying 10.0.0.1 … Open
Authorised users only
User Access Verification
Password: Duytan3
R1>enable
Password: Duytan1
R1#exit
[Connection to 10.0.0.1 closed by foreign host]
14) Verify Telnet access fails from PC2.
C:\> telnet 10.0.0.1
Trying 10.0.0.1 …
% Connection refused by remote host
15) Configure R1 so that administrators will be prompted to enter a username and password when they attempt to Telnet into the router. Use username admin and password Duytan4.
R1(config)#username admin secret Duytan4
R1(config)#line vty 0 15
R1(config-line)#login local
16) Verify you are prompted for a username and password when you attempt to Telnet to the router.
C:\> telnet 10.0.0.1
Trying 10.0.0.1 …Open
Authorised users only
User Access Verification
Username: admin
Password: Duytan4
R1>exit
[Connection to 10.0.0.1 closed by foreign host]
17) Allow the administrator workstation at 10.0.0.10 to SSH into R1. Use the domain name duytan.com and a 768 bit key.
R1(config)#ip domain-name duytan.com
R1(config)#crypto key generate rsa
The name for the keys will be: R1.duytan.com
Choose the size of the key modulus in the range of 360 to
2048 for your General Purpose Keys. Choosing a key modulus greater than 512 may take a few minutes.
How many bits in the modulus [512]: 768
% Generating 768 bit RSA keys, keys will be non-exportable...[OK]
18) Verify you can SSH into R1 from PC1. Close the session when done.
C:\> ssh –l admin 10.0.0.1
Open
Password: Duytan4
R1>exit
[Connection to 10.0.0.1 closed by foreign host]
19) Do you expect to be able to SSH to R1 from PC2? Why or why not? Verify this.
You will not be able to SSH to R1 from PC2. Telnet and SSH access are both controlled by the ‘line vty’ configuration which has an access list applied only allowing access from PC1.
C:\> ssh –l admin 10.0.0.1
Trying 10.0.0.1 …
% Connection refused by remote host
20) You can currently access R1 using either Telnet or SSH. Telnet is an insecure protocol as all communication is sent in plain text. Configure R1 so that only SSHv2 remote access is allowed.
R1(config)#line vty 0 15
R1(config-line)#transport input ssh
R1(config-line)#exit
R1(config)#ip ssh version 2
21) Verify you cannot Telnet into R1 from PC1 but can SSH. Exit when done.
C:\> telnet 10.0.0.1
Trying 10.0.0.1 …Open
[Connection to 10.0.0.1 closed by remote host]
C:\> ssh –l admin 10.0.0.1
Open
Password: Duytan4
R1>exit
[Connection to 10.0.0.1 closed by foreign host]
22) What username and password do you need to use to login when you connect directly to R1 with a console cable?
No username and password are currently required to login to the console. The virtual terminal lines which control Telnet and SSH access have been secured but console access has not.
23) Configure R1 to require no username but a password of Duytan5 to login over the console connection.
R1(config)#line console 0
R1(config-line)#login
% Login disabled on line 0, until 'password' is set
R1(config-line)#password Duytan5
24) Verify you can access R1 over the console connection and enter Privileged Exec mode.
R1(config-line)#end
R1#logout
R1 con0 is now available
Press RETURN to get started.
Authorised users only
User Access Verification
Password: Duytan5
R1>enable
Password: Duytan1
R1#
NTP Network Time Protocol
25) Configure R1 to synchronise its time with the NTP server at 10.0.1.100. Set the timezone as Pacific Standard Time which is 8 hours before UTC.
R1(config)#clock timezone PST -8
R1(config)#ntp server 10.0.1.100
26) Check the current time on the router and verify it is synchronised with the NTP server.
R1#show clock
16:19:36.51 PST Mon Oct 2 2017
R1#show ntp status
Clock is synchronized, stratum 2, reference is 10.0.1.100
nominal freq is 250.0000 Hz, actual freq is 249.9990 Hz,
precision is 2**19
reference time is DD53255C.0000039C (00:16:28.924 UTC Tue
Oct 3 2017)
clock offset is 0.00 msec, root delay is 0.00 msec
root dispersion is 0.02 msec, peer dispersion is 0.02 msec.
Switch Management
27) Configure SW2 with IP address 10.0.1.50 for management on VLAN 1. Ensure the switch has connectivity to other IP subnets.
(Note that it is best practice to NOT use VLAN 1 for any production traffic in a real world network and we would normally have a separate dedicated IP subnet for management traffic. We are using VLAN 1 in our lab environment to simplify the topology).
SW2(config)#int vlan 1
SW2(config-if)#ip address 10.0.1.50 255.255.255.0
SW2(config-if)#no shutdown
SW2(config-if)#exit
SW2(config)#ip default-gateway 10.0.1.1
- Tìm hiểu quy ước đặt tên thiết bị lưu trữ trong Linux
- Tìm hiểu cấu trúc i-node và cách đọc thông tin tệp tin trong Linux
- Xu hướng mới trong phân tích và thiết kế hệ thống thông tin
- MuZero – Thuật toán Trí tuệ nhân tạo có khả năng tự học mạnh mẽ
- Chủ đề OSCP (Port Redirection and SSH Tunneling) (tiếp theo)