LAB cơ bản về SSL VPN
Cho sơ đồ mạng như sau:
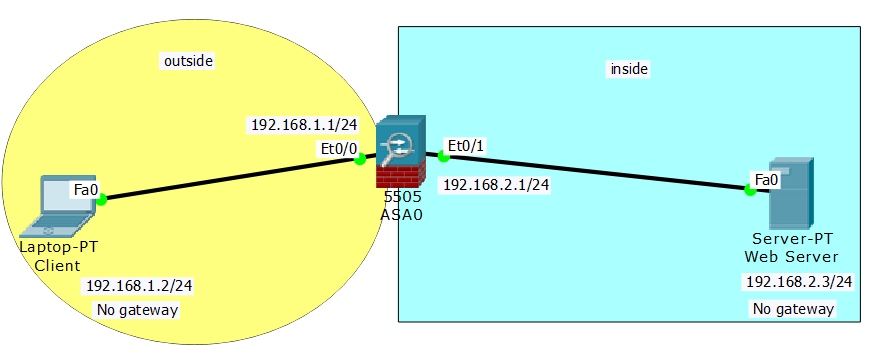
Cấu hình WebVPN để Client phía outside có thể truy cập cào Web Server phía inside.
-
SSL VPN còn được gọi là giải pháp “clientless”. Điều này cũng có nghĩa là các giao thức có thể được xử lý bởi SSL VPN sẽ bị hạn chế nhiều hơn.
-
Với SSL VPN, thay vì cho phép VPN client truy xuất vào toàn bộ mạng hoặc một mạng con (subnet) như với IPsec, có thể hạn chế chỉ cho phép truy xuất tới một số ứng dụng cụ thể.
-
Nếu một ứng dụng mà bạn muốn họ truy cập không phải là là loại ứng dụng dựa trên trình duyệt (browser-based), thì cần phải tạo ra một plug-ins Java hoặc Active-X để làm cho ứng dụng đó có thể truy xuất được qua trình duyệt.
-
SSL VPN hoạt động ở session layer, điều này cho nó khả năng điều khiển truy cập theo khối tốt hơn.
-
SSL VPN sử dụng chứng chỉ số (digital certificates) để xác thực server.
-
SSL VPN không cần phần mềm VPN client trên máy khách (ngoại trừ trình duyệt Web), SSL VPN gateways vẫn có thể cung cấp các tiện ích “quản lý máy khách ” bằng cách buộc trình duyệt phải chạy các applets.
Cấu hình trên firewall ASA:
Outside IP: 192.168.1.1/24 (interface vlan2)
Inside IP: 192.168.2.1/24 (interface vlan1)
User login: test
User password: test.test
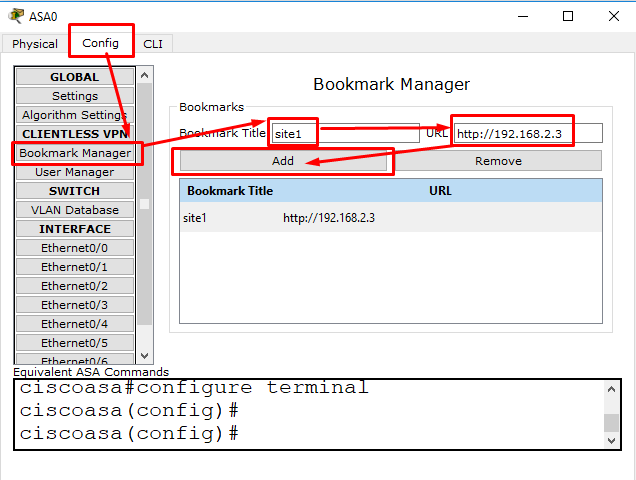
Website ID : site1 (https://192.168.2.3)
Bước 1) Tạo 1 bookmark có tên site1 liên kết đến địa chỉ URL là http://192.168.2.3 (đây chính là IP trên con Web Server) trên con firewall ASA 5505.
Bước 2) Cấu hình IP cho máy Client phía outside (không gateway)
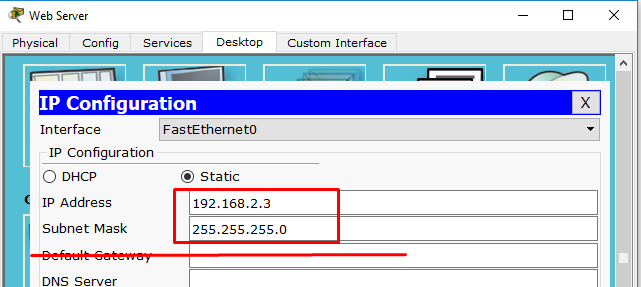
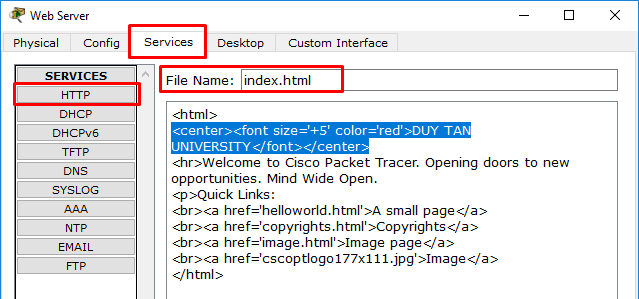
Bước 3) Cấu hình IP & chỉnh lại trang index.html trên Web Server phía inside
Bước 4) Cấu hình trên Firewall ASA
Bước 4.1) Cấu hình cổng vlan1
ciscoasa(config)#interface vlan 1
ciscoasa(config-if)#no ip address
ciscoasa(config-if)#nameif inside
ciscoasa(config-if)#security-level 100
ciscoasa(config-if)#ip address 192.168.2.1 255.255.255.0
ciscoasa(config-if)#exit
ciscoasa(config)#
Bước 4.2) Cấu hình cổng vlan2
ciscoasa(config)#interface vlan 2
ciscoasa(config-if)#no ip address
ciscoasa(config-if)#nameif outside
ciscoasa(config-if)#security-level 0
ciscoasa(config-if)#ip address 192.168.1.1 255.255.255.0
ciscoasa(config-if)#exit
ciscoasa(config)#
Bước 4.3) Access vlan cho 2 cổng e0/0 & e0/1
ciscoasa(config)#interface ethernet 0/0
ciscoasa(config-if)#switchport access vlan 2
ciscoasa(config-if)#exit
ciscoasa(config)#
ciscoasa(config)#interface ethernet 0/1
ciscoasa(config-if)#switchport access vlan 1
ciscoasa(config-if)#exit
ciscoasa(config)#
Bước 4.4) Cấu hình webvpn
ciscoasa(config)#webvpn
ciscoasa(config-webvpn)#enable outside
ciscoasa(config-webvpn)#exit
ciscoasa(config)#object network LAN
ciscoasa(config-network-object)#subnet 192.168.2.0 255.255.255.0
ciscoasa(config-network-object)#exit
ciscoasa#conf t
ciscoasa(config)#object network LAN
ciscoasa(config-network-object)#nat (inside,outside) dynamic interface
ciscoasa(config-network-object)#exit
ciscoasa#
ciscoasa#conf t
ciscoasa(config)#
ciscoasa(config)#group-policy group1 internal
ciscoasa(config)#group-policy group1 attributes
ciscoasa(config-group-policy)#vpn-tunnel-protocol ssl-clientless
ciscoasa(config-group-policy)#webvpn
ciscoasa(config-group-webvpn)#url-list value site1
ciscoasa(config-group-webvpn)#exit
ciscoasa(config-group-policy)#exit
ciscoasa(config)#username test password test.test
ciscoasa(config)#username test attributes
ciscoasa(config-username)#vpn-group-policy group1
ciscoasa(config-username)#exit
ciscoasa(config)#end
ciscoasa#copy running-config startup-config
Tóm tắt file cấu hình:
ciscoasa#show running-config
!
interface Ethernet0/0
switchport access vlan 2
!
interface Ethernet0/1
!
interface Vlan1
nameif inside
security-level 100
ip address 192.168.2.1 255.255.255.0
!
interface Vlan2
nameif outside
security-level 0
ip address 192.168.1.1 255.255.255.0
!
webvpn
enable outside
object network LAN
subnet 192.168.2.0 255.255.255.0
!
object network LAN
nat (inside,outside) dynamic interface
!
group-policy group1 internal
group-policy group1 attributes
vpn-tunnel-protocol ssl-clientless
webvpn
url-list value site1
username test password D35rLrqYJOMRHDCX encrypted
username test attributes
vpn-group-policy group1
!
ciscoasa#
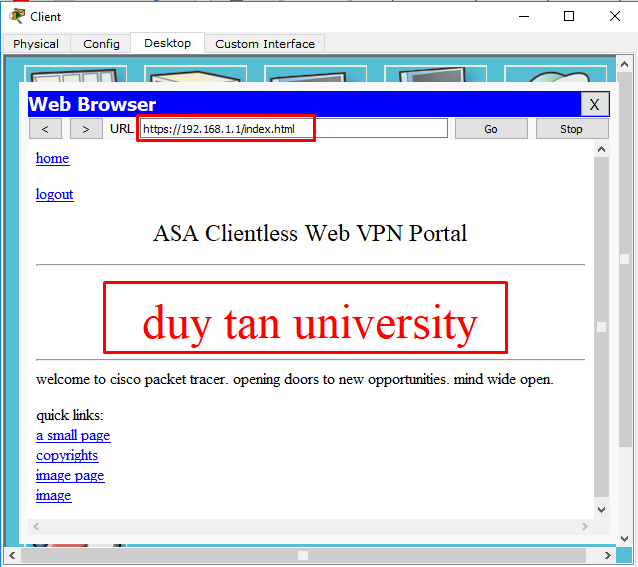
Bước 5) Kiểm thử
Đứng tại Client phía outside, mở trình duyệt, truy cập vào địa chỉ https://192.168.1.1

Nhập User Name=test; Password=test.test