


HƯỚNG DẪN CÀI ĐẶT VÀ CẤU HÌNH KVM
Đây là phần ảo hóa với KVM (Kernel-based Virtual Machine) và QEMU. KVM là công nghệ ảo hóa phần cứng và đòi hỏi CPU trên máy tính phải được hỗ trợ một trong các công nghệ sau: Intel VT hoặc AMD-V.
1. Giới thiệu
Trong kiến trúc KVM, máy ảo là một tiến trình Linux, được lập lịch bởi chuẩn Linux scheduler. Trong thực tế mỗi CPU ảo xuất hiện như là một tiến trình Linux. Điều này cho phép KVM sử dụng tất cả các tính năng của Linux kernel.

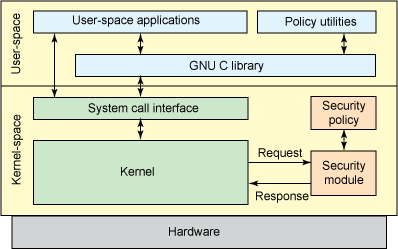
Chính sách bảo mật và thực thi độc lập sử dụng KVM
KVM thừa kế tính năng quản lý bộ nhớ mạnh mẽ của linux. Khi chạy một máy ảo trên KVM thì bộ nhớ(Memory) của nó được lưu trữ như là bộ nhớ của bất kỳ một tiến trình nào chạy trên linux, và chúng có thể trao đổi được với nhau, mà về vấn đề quản lý bộ nhớ thì chúng ta cũng đã có sẵn các tài liệu từ các trang web uy tín, điều đó giúp cho việc quản lý bộ nhớ đạt được hiệu năng tốt nhất, các tập tin về đĩa có thể chia sẽ hoặc hỗ trợ cho bộ nhớ của máy ảo.
e

Lưu trữ trên KVM

KVM hỗ trợ live migration cho phép di chuyển máy ảo đang chạy giữa các host vật lý khác nhau mà không bị gián đoạn dịch vụ. Nó trong suốt với người sử dụng cuối(end user). Máy ảo vẫn ở trạng thái running, các kết nối network vẫn hoạt động và ứng dụng của người dùng vẫn chạy trong khi máy ảo di chuyển sang một host vật lý mới.

2. Cài đặt
[1] Cài một số Packages
[root@dlp ~]# yum -y install qemu-kvm libvirt python-virtinst bridge-utils
[root@dlp ~]# lsmod | grep kvm # make sure modules are loaded
kvm_intel46589 0
kvm 292815 1 kvm_intel
[root@dlp ~]# /etc/rc.d/init.d/libvirtd start
Starting libvirtd daemon: [ OK ]
[root@dlp ~]# /etc/rc.d/init.d/messagebus start
Starting system message bus: [ OK ]
[root@dlp ~]# chkconfig libvirtd on
[root@dlp ~]# chkconfig messagebus on
[2] Cấu hình Bridge Networking cho KVM Virtual Machine
[root@dlp ~]# mv /etc/sysconfig/network-scripts/ifcfg-eth0 /etc/sysconfig/network-scripts/ifcfg-br0
[root@dlp ~]# vi /etc/sysconfig/network-scripts/ifcfg-br0
# change
DEVICE=br0
HWADDR=00:0C:29:5F:03:42
# change
TYPE=Bridge
UUID=c1539085-73d7-4455-ac82-88f26464458a
ONBOOT=yes
NM_CONTROLLED=yes
BOOTPROTO=none
IPADDR=10.0.0.30
NETMASK=255.255.255.0
GATEWAY=10.0.0.1
DNS1=10.0.0.1
IPV6INIT=no
USERCTL=no
[root@dlp ~]# vi /etc/sysconfig/network-scripts/ifcfg-eth0
# create new
DEVICE=eth0
TYPE=Ethernet
ONBOOT=yes
BRIDGE=br0
[root@dlp ~]# /etc/rc.d/init.d/network restart
Shutting down interface br0: [ OK ]
Shutting down interface eth0: [ OK ]
Shutting down loopback interface: [ OK ]
Bringing up loopback interface: [ OK ]
Bringing up interface eth0: [ OK ]
Bringing up interface br0: Determining if ip address 10.0.0.30 is already in use for device br0...
[ OK ]
[root@dlp ~]# ifconfig
br0 Link encap:Ethernet HWaddr 00:0C:29:5F:03:38
inet addr:10.0.0.30 Bcast:10.0.0.255 Mask:255.255.255.0
inet6 addr: fe80::20c:29ff:fe5f:338/64 Scope:Link
UP BROADCAST RUNNING MULTICAST MTU:1500 Metric:1
RX packets:65 errors:0 dropped:0 overruns:0 frame:0
TX packets:71 errors:0 dropped:0 overruns:0 carrier:0
collisions:0 txqueuelen:0
RX bytes:4370 (4.2 KiB) TX bytes:13742 (13.4 KiB)
eth0 Link encap:Ethernet HWaddr 00:0C:29:5F:03:38
inet6 addr: fe80::20c:29ff:fe5f:338/64 Scope:Link
UP BROADCAST RUNNING MULTICAST MTU:1500 Metric:1
RX packets:38727 errors:0 dropped:0 overruns:0 frame:0
TX packets:20836 errors:0 dropped:0 overruns:0 carrier:0
collisions:0 txqueuelen:1000
RX bytes:52608947 (50.1 MiB) TX bytes:1867883 (1.7 MiB)
lo Link encap:Local Loopback
inet addr:127.0.0.1 Mask:255.0.0.0
inet6 addr: ::1/128 Scope:Host
UP LOOPBACK RUNNING MTU:16436 Metric:1
RX packets:2 errors:0 dropped:0 overruns:0 frame:0
TX packets:2 errors:0 dropped:0 overruns:0 carrier:0
collisions:0 txqueuelen:0
RX bytes:1152 (1.1 KiB) TX bytes:1152 (1.1 KiB)
virbr0 Link encap:Ethernet HWaddr 52:54:00:73:7E:F3
inet addr:192.168.122.1 Bcast:192.168.122.255 Mask:255.255.255.0
UP BROADCAST RUNNING MULTICAST MTU:1500 Metric:1
RX packets:0 errors:0 dropped:0 overruns:0 frame:0
TX packets:0 errors:0 dropped:0 overruns:0 carrier:0
collisions:0 txqueuelen:0
RX bytes:0 (0.0 b) TX bytes:0 (0.0 b)
[3] Cài đặt GuestOS & tạo Virtual Machine
[3.1] Tạo Storage Pool
Mặt định thì Image của Virtual Machine được lưu tại /var/lib/libvirt/images và được xem như Storage Pool mặc định. Trong ví dụ này chúng ta tạo 1 Storage Pool mới.
# create a new Storage Pool
[root@dlp ~]# mkdir -p /var/kvm/images
[root@dlp ~]# virt-install \
--name www \
--ram 2048 \
--disk path=/var/kvm/images/www.img,size=30 \
--vcpus 2 \
--os-type linux \
--os-variant rhel6 \
--network bridge=br0 \
--graphics none \
--console pty,target_type=serial \
--location 'http://ftp.jaist.ac.jp/pub/Linux/CentOS/6.6/os/x86_64/' \
--extra-args 'console=ttyS0,115200n8 serial'
Starting install... # start installation
ý nghĩa các Options:
--name
specify the name of Virtual Machine
--ram
specify the amount of memories of Virtual Machine
--disk path=xxx ,size=xxx
'path=' ⇒ specify the location of disks of Virtual Machine
'size=' ⇒ specify the amount of disks of Virtual Machine
--vcpus
specify the virtual CPUs
--os-type
specify the type of GuestOS
--os-variant
specify the kind of GuestOS
--network
specify network types of Virtual Machine
--graphics
specify the kind of graphics. if set 'none', it means nographics.
--console
specify the console type
--location
specify the location of installation where from
--extra-args
specify parameters that is set in kernel
[3.2] Install on text mode, it's the same with common procedure of installation. After finishing installation, reboot first and then login prompt is shown like follwos.
CentOS release 6.5 (Final)
Kernel 2.6.32-431.17.1.el6.x86_64 on an x86_64
localhost.localdomain login: # login with a user set in installation
Password:
[root@localhost ~]#
[3.3] Move to GuestOS to HostOS with Ctrl + ] key
Move to HostOS to GuestOS with a command 'virsh console (name of virtual machine)'.
[root@localhost ~]# # push Ctrl + ]
[root@dlp ~]# # Host's console
[root@dlp ~]# virsh console www # move to Guest
Connected to domain www
Escape character is ^] # Enter key
[root@localhost ~]# # Guest's console
[3.4] Because after installing GuestOS from network, it is minimum settings, so it's useful to save it as a template in order to create new virtual machines later.
[root@localhost ~]# # Ctrl + ] key
[root@dlp ~]# # Host's console
[root@dlp ~]# virt-clone --original www --name template --file /var/kvm/images/template.img
Allocating 'template.img' | 20 GB 01:44
Clone 'template' created successfully.
[root@dlp ~]# ll /var/kvm/images/template.img # disk image
-rwxr-xr-x 1 root root 21474836480 Jul 11 20:05 /var/kvm/images/template.img
[root@dlp ~]# ll /etc/libvirt/qemu/template.xml # xml file
-rw------- 1 root root 1340 Jul 11 20:04 /etc/libvirt/qemu/template.xml
[3.5] Set basic initial configuration to GuestOS first before using it.
[3.6] Define a new Storage Pool
[root@dlp ~]# mkdir /etc/libvirt/storage
[root@dlp ~]# vi /etc/libvirt/storage/disk01.xml
# create new
# any name you like
# specify a pool directory
# define the pool
[root@dlp ~]# virsh pool-define /etc/libvirt/storage/disk01.xml
Pool disk01 defined from /etc/libvirt/storage/disk01.xml
# start the pool
[root@dlp ~]# virsh pool-start disk01
Pool disk01 started
# set auto-start
[root@dlp ~]# virsh pool-autostart disk01
Pool disk01 marked as autostarted
# confirm to show the pool list
[root@dlp ~]# virsh pool-list
NameStateAutostart
-----------------------------------------
disk01activeyes
# confirm to show the details
[root@dlp ~]# virsh pool-info disk01
Name:disk01
UUID:c7e34241-1a81-79f1-e081-671858f0eb24
State:running
Persistent:yes
Autostart:yes
Capacity:283.33 GB
Allocation:84.90 GB
Available:198.43 G
Nguồn:
[1] http://en.wikipedia.org/wiki/Kernel-based_Virtual_Machine